8 Computers & Contacts – Managing Contacts
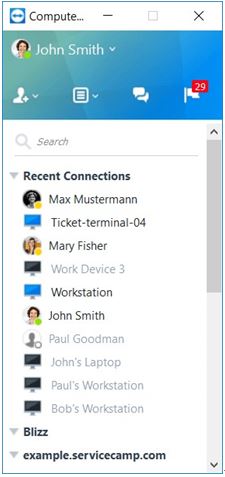
In Computers & Contacts, you can centrally manage computer and contact data of TeamViewer connection partners.
You can see at a glance which computer or contact is available and you can start a meeting directly. Computers & Contacts also offers other useful functions similar to an instant messen- ger.
The Computers & Contacts list is linked to your TeamViewer account. This means that your contact information is not tied to a specific computer but is stored in a central location. This lets you access your contacts from any computer running TeamViewer.

In Computers & Contacts, you can see at a glance which computers and contacts are online.
Moreover, the Computer & Contacts lists can be used for remote monitoring and for asset tracking of your computers and is a component of the service queue in the TeamViewer Management Console. More information can be found in the TeamViewer Manual – Manage- ment Console.
Computers & Contacts offers the following advantages:
l See your computers and contacts online.
l Quickly set up a connection without the need to enter connection information.
l Access and manage your computers and contacts from anywhere in the world.
l Send messages to your contacts using the Group Chat, Offline Messages or blacklist con- tacts for chat.
l Manage computers and contacts in groups and add your own notes to them.
l Predefine connection settings for individual computers, contacts and groups.
l Set your own availability status.
l Remote monitoring for your computers.
l Connect directly to partners via service cases.
l Video calls with up to 10 persons.
l Personal and professional presentation with profile pictures.
Note: Computers & Contacts is a component of the TeamViewer account. To be able to use
it, you have to register once for a TeamViewer account (see section 8.1.1 , page 41).
8.1 The TeamViewer account
Note: You do not need a TeamViewer account to use TeamViewer.
Note: There is no extra charge for using a TeamViewer account. You can create and use a TeamViewer account for free.
With a TeamViewer account, you can save information regarding your computers and contacts in a central location and manage your Computers & Contacts from anywhere.
A TeamViewer account is required for using the following TeamViewer functions:
l TeamViewer QuickConnect.
l Computers & Contacts
l Schedule and manage Meetings.
l Web Login.
8.1.1 Creating a TeamViewer account
To create a TeamViewer account, follow these steps:
1. In the TeamViewer main window, click Computers & Contacts on the status bar.
The Computers & Contacts window will open.
2. In Computers & Contacts, click the Sign Up button.
This launches a wizard, which will guide you through the process of creating a
TeamViewer account in two easy steps.
3. In the Create TeamViewer account - Step 1 of 2 dialog box, enter your Username, E- Mail and Password.
4. If you want to subscribe to our newsletter, activate the Subscribe to our free news- letter check box.
5. Click the Next button.
You will receive an e-mail with a validation link at the address provided.
6. In Create TeamViewer account - Step 2 of 2, you will be able to set up permanent access to this computer. To do so, enter any Computer name (for identification) and Password (random password you can use for connections to this computer).
7. If you want to configure TeamViewer on this computer as a system service, activate the I want to control this computer from remote check box.
8. Click the Next button.
9. Click the Finish button.
10. To finish creating your TeamViewer account, click the validation link in the e-mail you received.
11. You have now successfully set up your TeamViewer account.
If you want to make any changes later on, such as to your e-mail address or password, use the Account Management options. There you can also link your Premium or Corporate License to your account (see section 13.5 , page 115).

Creating a TeamViewer account via the website.
8.1.2 Managing your TeamViewer account
You can manage your TeamViewer account settings either via a web browser or directly in TeamViewer options.
To manage your account settings in a web browser, follow these steps:
1. Enter the following URL in your web browser: https://login.teamviewer.com.
2. Enter your TeamViewer account login information in the E-Mail and Password fields.
3. Click Log On.
The user interface of the TeamViewer Management Console and Computers & Contacts will load.
Note: If you have never used your TeamViewer account on a device, with an app or within a browser, you have to authorize the account usage at the first login.
5. Click the Edit profile link in the upper right-hand corner.
A window containing your account settings will open.
6. You can now apply changes to your personal information.
© Copyright 2000-2025 COGITO SOFTWARE CO.,LTD. All rights reserved