
Reference Manual
This documentation defines the whole features of the application CrossManager, designed to convert 2D and 3D models from a list of available input formats into one of the possible output formats.
New in this version:
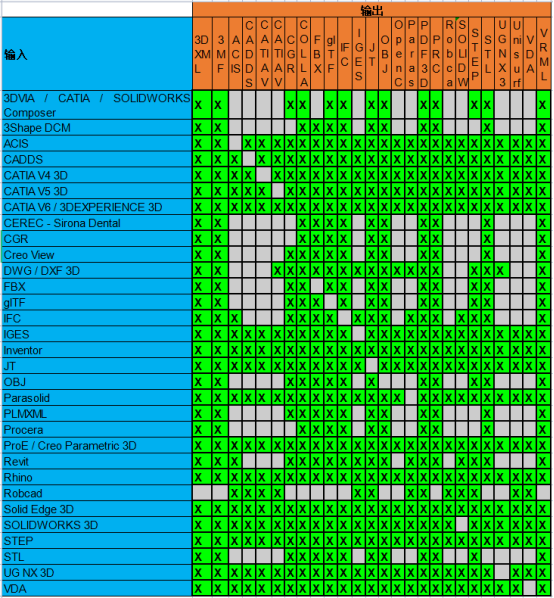
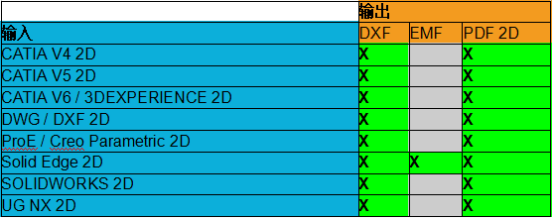
(see table in appendix for available combinations)
The configuration file dtkConfig.dtk is located in the following folder: C:\Users\[user_name]\AppData\Roaming\Datakit\CrossManager
as shown in the dialog box under "Configure":

It is now made possible to select a different path for the configuration file via the button 
The button  makes it easy to get back to the default path.
CrossManager is delivered by downloading crossmanager2019_installer_xxbit.zip containing the installation program of the current release for Windows (Vista/7/8/10).
The hardware configuration (i.e. processor speed, RAM, etc.) mostly depends on the size of the files that have to be converted. However, a 2 GHz CPU and 4 GB of RAM are recommended. The installation of CrossManager will take about 250 MB on your hard disk drive.
CrossManager is available in the following languages: French, English, Italian, German, Czech, Chinese and Russian. To run it in the language of your choice, Press the "Options" button that opens the following window :
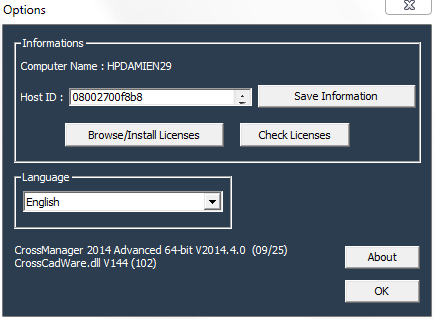
The combobox allows you to select the desired language.
The "Save Information" button writes the Host Name and the Host Id of the PC into a file.
The "Browse / Install Licenses" button allows you to select and activate the desired Flexlm license file.
The "Check Licenses" button displays the list of available modules in a window.
The CrossManager documentation is available both in French and English, in .chm format.
The downloaded file crossmanager2019_installer_xxbit.zip allows installing CrossManager with the setup program included in the compressed file. The program suggest you to install Visual C++ Runtime Libraries (x86 or x64) if these one are not yet installed on your computer.
In the "Options" menu, click on the "Browse/Install licenses" button, then browse your disk to the location of your license file and select it.
Proceed as follows :
The mouse to be used for CrossManager needs two buttons at least, but profits of an eventual third one or of a wheel. This menu is depending of the context in which it is used, before or after the translation.
Kinds of actions
The mouse can be used in two ways, either by clicking, or by dragging/dropping.
o Clicks left are dedicated to choice of actions and highlighting
o Clicks right is dedicated to contextual menu
Drags are dedicated to addition of files in the list that fulfill the Input Format type.
Here is the appearing menu when using "Right Click" :

This menu lets appear functions available with different buttons described below.
The Menus Add Directory and Add Directory (recursive) as well as Load a list of files to be converted are not available in the basic version.
when you click the black arrow of the combobox called "Select an input format" , here is the list of CAD format supported as input by CrossManager :
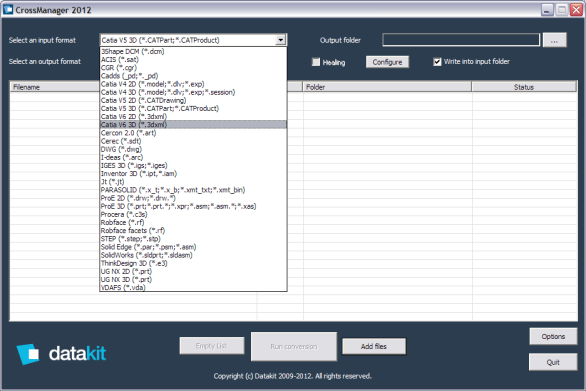
A filter will limit the selection of files to the selected format with the "Add Files" button.
When you click the black arrow of the combobox called "Select an output format" , here is the list of CAD format supported as output by CrossManager that is displayed in the combobox :
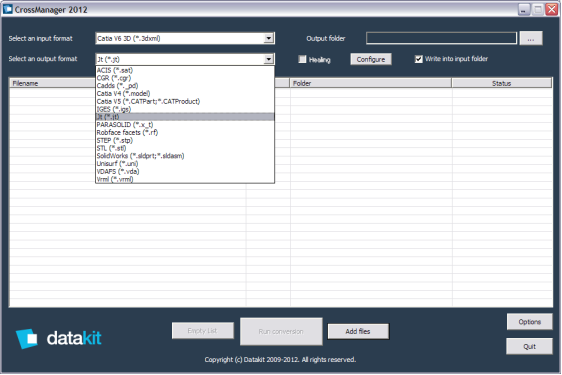
If the checkbox called "Write into input folder" , is checked the output file generated by CrossManager will be created inside the input folder. If you want to choose your output directory, unchek this checkbox, and click on the "..." button in the upper right corner to select this folder.

When you click on the "Add Files" button, the following window appears and let you select the database to convert with a list restricted to the chosen format of input files: (This list is limited to the number of 100 files to be converted for the basic version)
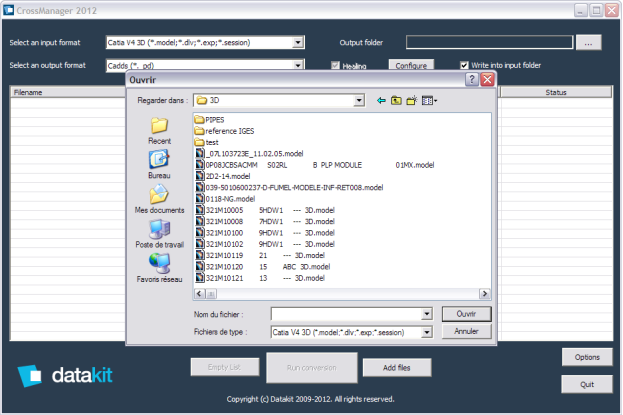
The "Drag and Drop" feature is also available to fill the list of input files to convert. The "Drop" of the file will be possible only if the selected file fulfill the input format chosen. This applies as well to Folders: All the files from this folder that fulfill the input format are added to the list.
Once your list is created, you can edit this list with the contextual menu as shown in the following window :
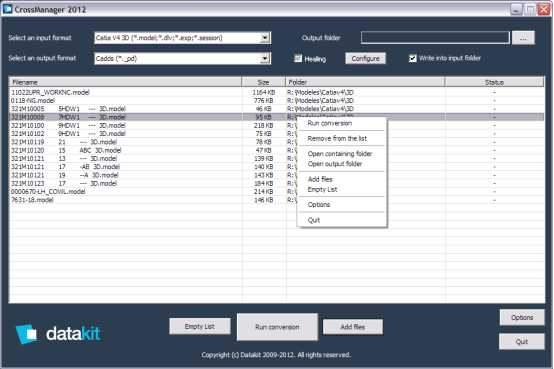
The "Run conversion" menu as well as the "Run conversion" Button starts the converter with each file of the list created above one after the other.
The "Remove from the list" menu allows suppressing a set of selected files from the list. Furthermore file or Files can be removed from the list by highlighting the File(s) and pressing the "Del" key.
The "Open containing folder" opens the folder in which is located the file, inside the File Explorer.
The "Open output folder" opens the folder in which output files are generated, inside the File Explorer.
The "Add files" menu as well as the "Add files" Button opens the File browser to select a new file for the list.
The "Empty List" menu as well as "Empty List" button clears the list of files to convert.
The "Options" menu as well as the "Options" Button opens the Options Window to allow you to change the Language of the interface.
The "Quit" menu as well as the "Quit" Button stops the execution of CrossManager.
After conversion has ended, you can use the contextual menu as shown below :

The menu "Run conversion" allows running again converter on the files of the list.
The menu "Save results report" specific at this context allows to record the content of this window in an excel file (CSV Format) with all the File names, the File size and the status of conversion.
The Menu "Open containing folder" allows opening with Windows explorator the folder in which input file is present.
The menu "Open output folder" allows opening with Windows explorator the folder in which output file is present.
The Menu "Empty list" specific to that context, as well as button, empties the spooler of files to convert.
The menu "Options" as well as button, allows opening Option window.
The menu "Quit" as well as button, ends the execution of the converter.
When "Output Format" is "IGES" or "STEP" you are allowed to filter some kinds of data by unchecking the checkbox "correction" (if not, the "Config" button is not active) When you Press the "Config" button, the following dialog box looks like that :
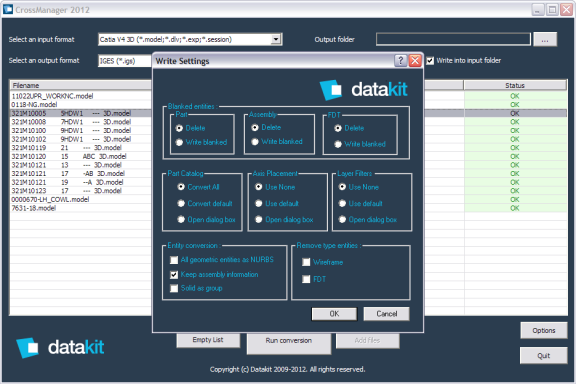
Parts can be deleted or written as blanked entities, as well as Assemblies or FDT.
Wireframe entities or FDT entities can be filtered and removed from the output. The Dialog Box allows three parameters :
· Choose one model out of several in a catalog.
· Select a new referential by choosing an Axis placement.
· Process of Layer by activation of a filter.
The converter allows you operate this transformation into the model :
· All geometric entities can be converted into nurbs (curves and surfaces)
· Keep assembly information or not.
· Keep Solid entities as group or not.
When the selected "Output Format" is "STL", "VRML", "CGR", "Collada", "JT" or "PDF 3D", the "Config" menu provides additional options to set the tessellation parameters:

Tessellation settings :
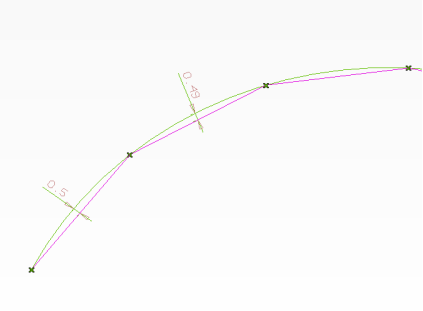
Disable: disables the consideration of a linear tolerance factor.
Current value: linear tolerance value in millimeters, it corresponds to the maximal chord error between the surface and the triangle (see below).
o Angular Tolerance
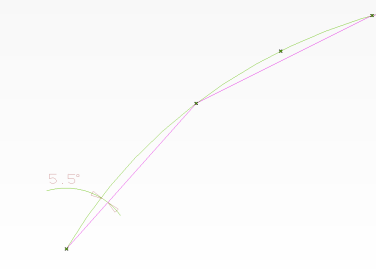
Disable: disables the consideration of an angular tolerance factor.
Current value: angular tolerance factor in degrees, it corresponds to the maximal allowed drift between a triangle's edge and the tangent to the surface (see below).
Some input formats contain both a tessellated representation of the geometry and exact geometry, in this case onecan choose whether the tessellated geometry is directly recovered from the input file ("Use Existing Meshes") or if the tessellation is recomputedaccording to the parameters defined above ("Force Tesselation").
The input formats concerned are JT, Catia V5 and CATIA V6.
Logically, if the input file contains exact geometry only, this option is not taken into account: the tessellation isautomatically calculated even if "Use Existing Meshes" is selected.
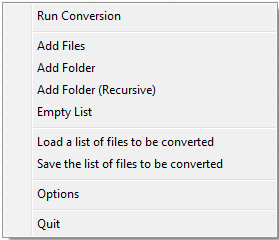
"Add Folder" allows to import all files (in the chosen input format) from a selected folder.
"Add Folder (Recursive)" allows to import all files (in the chosen input format) from a selected folder and its sub-folders recursively.
"Load a list of files to be converted" allows to recall a previously saved list of files to be converted.
"Save the list of files to be converted" allows to store the list of files to be converted for future recall.
· CrossManager Advanced removes the limitation in the number of files that can be added to the list (the regular version of CrossManager is limited to 100 at a time).
· CrossManager Advanced is also available as a command line executable for integration in any file management process, the instructions to use it are the following:
o 1. download the CrossManager command line executable :
requested (on the OS Windows 64-bit)
\schema : schema files
CrossCadWare_x64.dll : Converters
dtkConfig.dtk : Config file
PS : these files and folder are in the CrossManager installation folder (default folder C:\Program Files\DATAKIT\CrossManager2022_64bit)
dtk_CrossManagerCmd_x64.exe : Command line executable
PS : put dtk_CrossManagerCmd_x64.exe in the same folder as CrossCadWare_x64.dll
o 2. Usage: Syntax: dtk_CrossManagerCmd_x64.exe [Input File] [Output File ] [Config File] [schema folder] [Input format] [Output format]
Formats: ACIS, STEP, PARASOLID, PARSOLIDB, IGES, CADDS, CATIAV4, CATIAV5, CATIA V6, PROE, ROBFACE, ROBFACE_FACET, SOLIDWORKS, SOLIDEDGE, UNIGRAPHICS, VDAFS, UNISURF, JT, STL, VRML, INVENTOR, CGR, 3DXML, DXF, DWG, COLLADA, PDF3D, CEREC, DCM, PROCERA, PLMXML, 3DM, OBJ, PRC, IFC, 3MF, BREPOCC, RVT, CREOVIEW, FBX, GLTF, SMG
Example:
a. dtk_CrossManagerCmd_x64.exe "c:\fichiers\test.CATPart" "c:\fichiers\test.igs" "c:\fichiers\dtkConfig.dtk" "c:\fichiers\schema" CATIAV5 IGES
b. dtk_CrossManagerCmd_x64.exe "c:\fichiers\test.stp" "c:\fichiers\test.CATPart" "c:\fichiers\dtkConfig.dtk" "c:\fichiers\schema" STEP CATIAV5
© Copyright 2000-2025 COGITO SOFTWARE CO.,LTD. All rights reserved