This document describes the procedures for installing Nagios monitoring agent, NSClient++, on a target Microsoft Windows desktop or server for the purposes of monitoring that machine with Nagios XI. This allows organizations to monitor vital metrics and ensure that a specific Windows desktop machine or server is functioning properly.
NSClient++ is one of many agents that can be used to monitor Windows devices. This document will go through the installation and use of NSClient++. However, for ease of use and greater functionality, Nagios Enterprises recommends using a multi-platform agent called NCPA that can be downloaded for Windows, Linux, and Mac devices.
The NSClient++ agent must be download(From Nagios XI web interface when using the Windows Server monitoring wizard) and installed on the target Windows machine and configured before Nagios can monitor system metrics, services, processes, or performance data on the target machine using the Windows Server configuration wizard.
Installing The Agent
Log on to the windows machine you wish to install the NSClient++ agent on.
Run the NSClient++ installer package to start the installation.
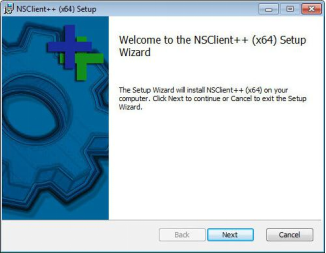
The welcome screen will appear.
Click Next to continue to the next step.
 |
Select Generic and click Next to continue.
 |
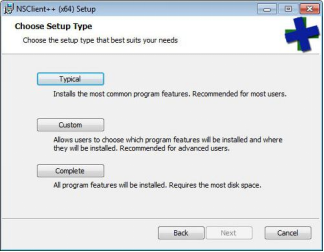
Click the Typical button.
 |
In the next step you will need to configure the NSClient++ agent.
Enter the IP address(s) of the Nagios XI server(s) in the Allowed hosts box. In this example you can see two addresses have been added (10.25.5.11 and 10.25.5.12 separated by a comma).
Enter a password in the Password box that is required for communication between the Nagios server and the Windows machine (used by check_nt plugin).
Enable common check plugins = Checked
Enable nsclient server (check_nt) = Checked
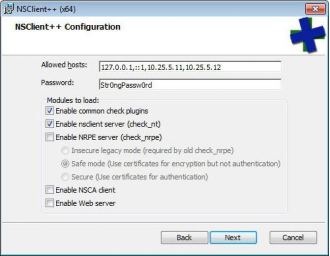 |
In the screenshot, NRPE has not been selected as it is not required by the using the Windows Server configuration wizard. NRPE does offer advanced monitoring capabilities however this is beyond the scope of this guide.
Click Next to continue.
Click the Install button on the next screen to begin the installation.
 |
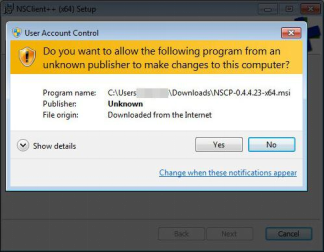
You may be prompted to grant permission to the installer to make changes to the computer, click Yes to continue.
 |
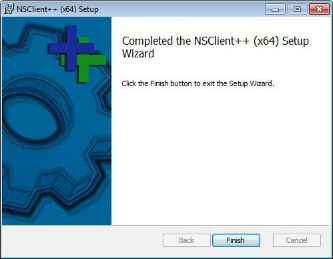
Wait while NSClient++ is installed and click Finish to complete the setup.
 |
The NSClient++ agent will now be running as a service, which means the Windows machine is ready to be monitored with Nagios XI.
Configuration Wizards
Once the installation is complete you are now able to use the Windows Server or Windows Desktop configuration wizards, no additional steps are required.
This document describes how to monitor Microsoft Windows using the NSClient++ monitoring agent. There are two different methods for communicating with NSClient++ and this documentation explains them both.
The two methods for communicating with NSClient++ are explained as follows:
You can use a combination of both methods in Nagios XI, it is not a choice of one or the other.
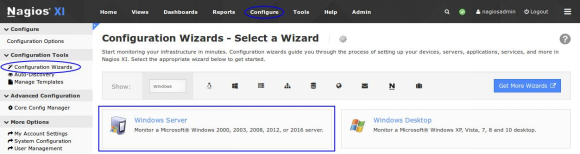
To begin using one of the Windows wizards navigate via the top menu bar to Configure > Run a configuring wizard and select the desired wizard. This documentation will focus on the Windows Server wizard. In the following screenshot you can see how the search field allows you to quickly find a wizard.
 |
On Step 1 you will be asked to supply the address of the Windows machine running NSClient++.
Click Next to progress to step 2.
 |
On step 2 you will configure all of the options for monitoring.
To start off with make sure a valid Host Name has been entered.
The Windows Agent section has a field for the password you provided the NSClient++ installer. If you did not use a password then you can leave this field blank.
Select the server metrics you wish to monitor and adjust the thresholds as required.
The Disk Usage checks allow you to add the disks you wish to monitor, adjust the thresholds as required.
 |
With the Services checks, select any of the predefined services in the list or add your own.
With the Processes checks, select any of the predefined services in the list or add your own.
 |
With the Performance Counter checks, select any of the predefined counters in the list or add your own.
 |
Once you've finished selecting all the items you wish to monitor click Next and then complete the wizard by choosing the required options in Step 3 - Step 5.
To finish up, click on Finish in the final step of the wizard. This will create the new hosts and services and begin monitoring. Once the wizard applies the configuration, click the View status details for <your host> link to see the new host and services that were created.
 |
This completes using the Windows Server wizard.
NRPE Configuration Wizard
Install NSClient++ and enable NRPE Listener as below:
Update NSClient++ Configuration
The configuration file in NSClient++ 0.4.x is called nsclient.ini and is located here:
C:\Program Files\NSClient++\nsclient.ini
The configuration file can be manually edited OR you can execute commands in a command prompt to make the required changes in the configuration file. This document instructs you to execute the commands to make the changes. Following this is a summary showing you the updated settings in the configuration file.
Log onto your remote windows machine as an administrator.
Open a command prompt with administrative rights and run the following commands:
cd "C:\Program Files\NSClient++"
nscp settings --activate-module NRPEServer --add-defaults
nscp settings --path /settings/NRPE/server --key "allow arguments" --set true
nscp settings --path /settings/NRPE/server --key "allow nasty characters" --set true nscp settings --path /settings/NRPE/server --key insecure --set true
nscp settings --path /settings/NRPE/server --key "verify mode" --set none nscp settings --activate-module CheckExternalScripts --add-defaults
nscp settings --path "/settings/external scripts" --key "allow arguments" --set true
nscp settings --path "/settings/external scripts" --key "allow nasty characters" --set true
This should not produce any output, however don't be alarmed if you see some Failed to register plugin errors.
Open the configuration file nsclient.ini in a text editor for editing (like Notepad) to see the updated configurations.
Under the [/modules] section you will see the following lines:
NRPEServer = enabled
CheckExternalScripts = enabled
Under the [/settings/NRPE/server] section you will see the following lines:
allow arguments = true
allow nasty characters = true
insecure = true
verify mode = none
Under the [/settings/external scripts] section you will see the following lines:
allow arguments = true
allow nasty characters = true
What does allow arguments, allow nasty characters and insecure do?
Restarting The NSClient++ Service
NSClient must now be restarted. In Windows open the Services console under Administrative Tools. If you cannot locate this, use services.msc to open the Services console.
Locate the NSClient++ service.
Right click the NSClient++ service and select Restart.
You can close the Services console as it's no longer required.
 |
Testing On The Nagios XI Server
Log in as root to the Nagios XI Server and enter the following:
cd /usr/local/nagios/libexec/
./check_nrpe -H [IP of the windows system]
You now should see the I seem to be doing fine... output, verifying the test is successful.

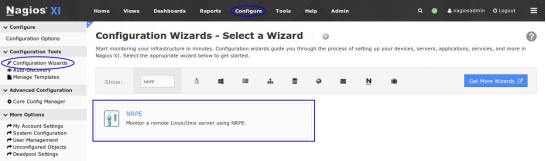
To begin using the NRPE wizard navigate via the top menu bar to Configure > Run a configuring wizard and select the NRPE wizard. In the screenshot on the following page you can see how the search field allows you to quickly find a wizard.
 |
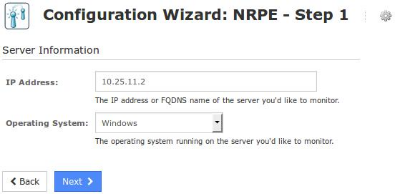
On Step 1 you will be asked to supply the address of the machine running NSClient++.
You will also have to select the Operating System, in this case it is Windows.
Click Next to progress to step 2.
 |
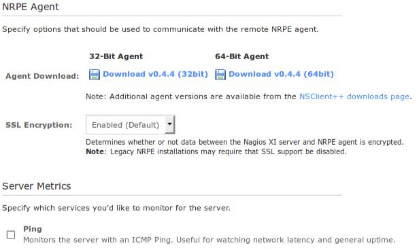
On step 2 you will configure all of the options for monitoring.
To start off with make sure a valid Host Name has been entered.
 |
The NRPE Agent section can be ignored because you have installed NSClient++.
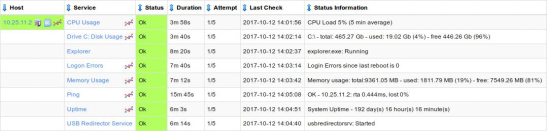
Under Server Metrics you can see that I've un-checked the Ping box as I'm not interested in a ping service.
 |
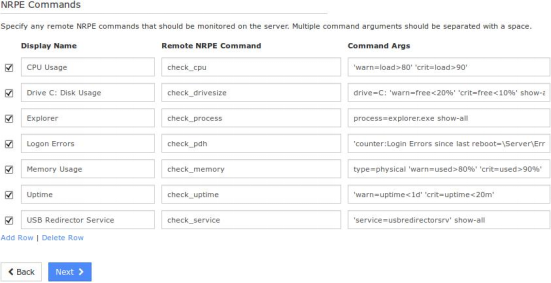
The next step is to define the NRPE Commands you want issued to the NSClient++ agent. Here are some example commands and their arguments, they provide similar functionality to that of the previous wizard and the services it created.
|
Display Name: |
CPU Usage |
Remote NRPE Command: |
check_cpu |
|
Command Args: |
'warn=load>80' 'crit=load>90' |
|
|
|
Display Name: |
Drive C: Disk Usage |
Remote NRPE Command: |
check_drivesize |
|
Command Args: |
drive=C: 'warn=free<20%' 'crit=free<10%' show-all |
|
|
|
Display Name: |
Explorer |
Remote NRPE Command: |
check_process |
|
Command Args: |
process=explorer.exe show-all |
|
|
|
Display Name: |
Logon Errors |
Remote NRPE Command: |
check_pdh |
|
Command Args: |
'counter:Login Errors since last reboot=\Server\Errors Logon' |
||
|
'warn=value>2' 'crit=value>20' |
|
|
|
|
Display Name: |
Memory Usage |
Remote NRPE Command: |
check_memory |
|
Command Args: |
type=physical 'warn=used>80%' 'crit=used>90%' |
|
|
|
Display Name: |
Uptime |
Remote NRPE Command: |
check_uptime |
|
Command Args: |
'warn=uptime<1d' 'crit=uptime<20m' |
|
|
|
Display Name: |
USB Redirector Service |
Remote NRPE Command: |
check_service |
|
Command Args: |
'service=usbredirectorsrv' show-all |
|
|
Once you've finished selecting all the items you wish to monitor click Next and then complete the wizard by choosing the required options in Step 3 - Step 5.
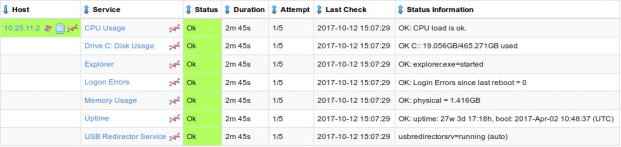
To finish up, click on Finish in the final step of the wizard. This will create the new hosts and services and begin monitoring. Once the wizard applies the configuration, click the View status details for <your host> link to see the new host and services that were created.
 |
This completes using the NRPE wizard.

© Copyright 2000-2025 COGITO SOFTWARE CO.,LTD. All rights reserved
