Nagios XI--Agent Installation Instructions

This document describes how to install the Nagios Cross Platform Agent (NCPA) on Windows, Linux and Mac OS X. NCPA is intended to simplify and universalize agent-based monitoring across different operating systems.
NCPA Installation Overview
This documentation covers installing NCPA using the ready built packages for the following platforms:
Active vs Passive
NCPA can be used for both Active and Passive monitoring:
The NCPA installer may prompt you for settings for active and passive. Active is the most common method used. If you are not using passive monitoring then you do not need to configure those settings.
Downloading NCPA Packages
Please visit the downloads page to obtain the relevant download package for your operating system (OS):
NCPA Downloads
If you are installing NCPA on Linux then the steps below for each Linux distribution will show you how to download the package at the command line, you do not need to download it right now.
Installing NCPA On Windows
The following instructions are for the graphical install of NCPA. If you wish to perform a silent installation please proceed to the Silent Install section.
Navigate to the location that the installer package was downloaded to and double-click the installer, this will bring up the Welcome screen.
Click Next to continue.

The license agreement will be shown.
Click I Agree

The configuration screen for Passive checks will be shown.
The only setting that is required here is a Token. This is what your Nagios server will use to authenticate with NCPA.
The Bind IP of 0.0.0.0 means that NCPA will listen on all Ipv4 addresses on the Windows machine. The default port of 5693 is used.
Click Next to proceed.

The configuration screen for Passive checks will be shown. You will need to check the Send passive checks over NRDP box to enable passive checks. You will also need to provide the following NRDP settings:
URL
This is the URL on your Nagios Host that accepts passive check results to be submitted.

NRDP Token
This is the token you will be using when passing NCPA passive checks to Nagios for NRDP to accept the check. This is separate from the token that was provided for active checks.
The URL and NRDP token in Nagios XI are configured via Admin > Check Transfers > Inbound Transfers.
Hostname
The hostname that the passive checks belong to on the Nagios server.
Click Next to proceed.
Continuing with Passive checks, you will be presented with the default passive service checks that will be executed and send to your Nagios server. These can be changed if required.
Click Next to proceed.

You will be presented with the install location. Change the destination folder if required.
Click the Install button to install NCPA.

Wait while NCPA is installed and configured.

Click Finish once NCPA has been installed.

Now that NCPA has been installed please proceed to the Configure Firewall - Windows section of this document.
Installing NCPA On Windows - Silent
The installer also supports a silent install, which allows system administrators to easily manage their network workstations without disrupting the workflow of the office. The following arguments currently supported.
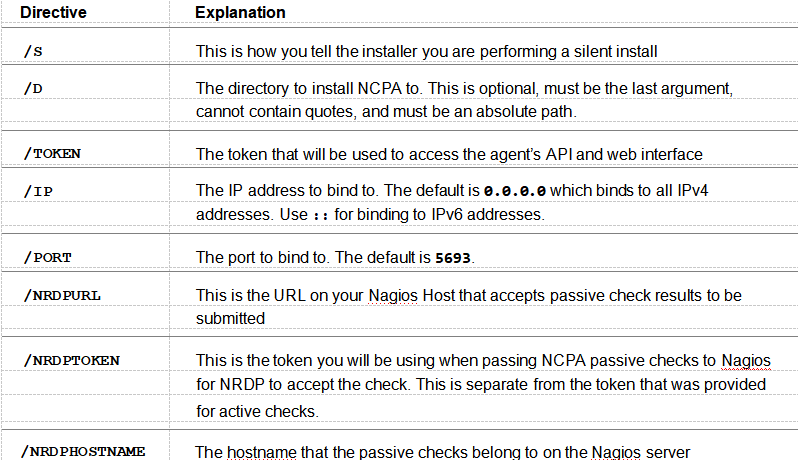
Using the previous graphic install of NCPA as an example, here is how you would install NCPA silently using those settings:
Now that NCPA has been installed please proceed to the Configure Firewall - Windows section of this document.
Installing NCPA On Linux
There are several methods for installing NCPA on Linux depending on your OS distribution. You will need to establish a terminal session as a root user to complete these steps.
Using Nagios Repository
The Nagios Repository can be used to install NCPA on RHEL / CentOS / Oracle Linux. The first step is to install the repository depending on the version of Linux.
Once the repository has been installed you will need to execute the following command to install NCPA:
yum install ncpa -y
Now that NCPA has been installed please proceed to the Configuring NCPA section of this document.
Using RPM Package
An RPM package can be used to install NCPA on RHEL / CentOS / Oracle Linux / openSUSE / SUSE SLES / AIX. The step below depends on the version and architecture of Linux you are running.
RHEL / CentOS / Oracle Linux 6.x i386
Configuring NCPA
This section is specifically for the Linux / Mac OS X / AIX installations as they do not provide configuration options as part of the installer. However the configuration file in Windows is the same, hence the information here is also valid for Windows.
This documentation will only focus on configuring NCPA for Active checks. Passive checks are covered in the following documentation:
Using NCPA For Passive Checks
The NCPA configuration file is located here:
/usr/local/ncpa/etc/ncpa.cfg
Execute the following command to open the file in vi:
When using the vi editor, to make changes press i on the keyboard first to enter insert mode. Press Esc to exit insert mode.
Find the following line:
community_string = mytoken
Change it to your required token, for example:
community_string = Str0ngT0k3n
When you have finished, save the changes in vi by typing:
:wq
and press Enter.
You will now need to restart the ncpa_listener service for these changes to take affect, please proceed to the Restart Service section of this documentation.
Restart Service
The command required for this will differ depending on your OS and version.
RHEL / CentOS / Oracle Linux 6.x
service ncpa_listener restart
RHEL / CentOS / Oracle Linux 7.x +
systemctl restart ncpa_listener.service
Ubuntu 12.x / 13.x / 14.x
sudo service ncpa_listener restart
Ubuntu 15.x +
sudo systemctl restart ncpa_listener.service
Debian 7.x
service ncpa_listener restart
Debian 8.x +
systemctl restart ncpa_listener.service
openSUSE / SUSE SLES 11.x
sudo /sbin/service ncpa_listener restart
openSUSE Leap 42.x + / SUSE SLES 12.x +
sudo systemctl restart ncpa_listener.service
AIX
stopsrc -s ncpa_listener
startsrc -s ncpa_listener
Mac OS X
sudo launchctl stop com.nagios.ncpa.listener sudo launchctl start com.nagios.ncpa.listener
Now that the ncpa_listener service has been restarted please proceed to the Configure Firewall - Linux section of this document.
Configure Firewall - Windows
A firewall rule needs to be created on your Windows machine to allow incoming traffic to NCPA on TCP Port 5693.
To change the firewall settings, select Start and type firewall in the search dialog box and open Windows Firewall with Advanced Security.
In Server 2012 / 2016 this is located at Server Manager > Tools > Windows Firewall with Advanced Security.
In the left hand pane click Inbound Rules
In the right hand pane click New Rule

Select Port
Click Next

Select TCP
Select Specified local ports and type 5693 in the field.
Click Next

Select Allow the connection
Click Next

Make any changes to where the rule should apply and click Next.

Give the rule a Name
Click Finish to create the rule.

Now that the firewall has been created please proceed to the Test NCPA section of this document.
Configure Firewall - Linux
A firewall rule needs to be created on your Linux machine to allow incoming traffic to NCPA on TCP Port 5693. The command required for this will differ depending on your OS and version.
RHEL / CentOS / Oracle Linux 5.x / 6.x
iptables -I INPUT -p tcp --destination-port 5693 -j ACCEPT service iptables save
ip6tables -I INPUT -p tcp --destination-port 5693 -j ACCEPT service ip6tables save
RHEL / CentOS / Oracle Linux 7.x +
firewall-cmd --zone=public --add-port=5693/tcp firewall-cmd --zone=public --add-port=5693/tcp --permanent
Ubuntu
sudo mkdir -p /etc/ufw/applications.d
sudo sh -c "echo '[NCPA]' > /etc/ufw/applications.d/ncpa"
sudo sh -c "echo 'title=Nagios Cross Platorm Agent' >> /etc/ufw/applications.d/ncpa"
sudo sh -c "echo 'description=Nagios Monitoring Agent' >> /etc/ufw/applications.d/ncpa"
sudo sh -c "echo 'ports=5693/tcp' >> /etc/ufw/applications.d/ncpa"
sudo ufw allow NCPA
sudo ufw reload
Debian
iptables -I INPUT -p tcp --destination-port 5693 -j ACCEPT apt-get install -y iptables-persistent Answer yes to saving existing rules
SUSE SLES 11.x
sudo sed -i '/FW_SERVICES_EXT_TCP=/s/\"$/\ 5693\"/' /etc/sysconfig/SuSEfirewall2 sudo /sbin/service SuSEfirewall2_init restart sudo /sbin/service SuSEfirewall2_setup restart
SUSE SLES 12.x +
sudo /usr/sbin/SuSEfirewall2 open EXT TCP 5693 sudo systemctl restart SuSEfirewall2.service
openSUSE Leap
The firewall is not enabled by default and allows port 5693.
AIX
Please refer to the AIX documentation.
Mac OS X
The firewall is not enabled by default and allows port 5693.
Now that the firewall has been defined please proceed to the Test NCPA section of this document.
Test NCPA
To ensure that the installation was successful and NCPA is now listening, try accessing the web interface of the agent. In order to do this you will need to know:
Open a web browser and connect to the NCPA web interface using the following URL:
https://<NCPA IP Address>:5693/
You will be presented with a security message. This is completely OK and expected. NCPA is using self signed certificates as it allows the communication to be encrypted. Your web browser is warning you because it does not know about the certificate.
You will need to click Advanced and then Add Exception or Proceed to xxx to allow you to use the NCPA page.
More information on certificates is explained in the
Understanding Certificate Warnings KB article.

You will then be shown the NCPA login page.
Type the token in the field and then click the Log In button.

Once you log in you will be placed on the Dashboard page with a summary of the NCPA version and machine it is running on.
Congratulations, NCPA is now ready to be monitored by Nagios.

Please proceed to the Configuring Nagios section of this document.
Configuring Nagios
Now that NCPA is installed on the remote machine, you can monitor the machine using the NCPA monitoring wizard in Nagios XI. Please refer to the following documentation for detailed steps:
Monitoring Devices Using The NCPA Agent And Nagios XI
The NCPA agent has built-in documentation in web interface, this is located on the Help tab. This gives the options to view or change configuration settings remotely as well as access additional info on NCPA.

© Copyright 2000-2025 COGITO SOFTWARE CO.,LTD. All rights reserved
