Step 1: Choose the computer where RLM Server software will be installed
The RLM Server software is a small application that you leave running on a computer of your choice, that then gives out license permissions for computers on the network to run HDR Light Studio.

Important! Choose this computer carefully as the license files generated will be locked to this machine.
Below is a list of criteria to consider when choosing where to install the RLM server software:
• It can be a dedicated license server or any suitable computer on the network
• It can be installed on Windows, MacOS or Linux operating system
• It’s easiest to install on Windows for less technical users!
• The computer needs to be on at all times when users need to use HDR Light Studio
• Ideally the computer is on all the time
• The computer needs to be accessible by the HDR Light Studio user computers over the network
• It can be a low specification computer
• Don’t choose a computer you plan to dispose of soon
• HDR Light Studio can also be run on the license server computer if required
Mobile Floating License on a Laptop: If you want to use HDR Light Studio both inside and outside of the office network - your license server computer can be a laptop. So, when you are in the office with that laptop turned on, any machine on the work network, or the laptop itself, can use HDR Light Studio. When you go home with that laptop, any machine on the home network, or the laptop itself, can also use HDR Light Studio.
Step 2: Download and Install RLM Server Software
In this example the RLM Server software will be installed on a Windows computer.
Log into your account then click on your username in the top right and select ‘Downloads’ from the drop-down menu.

At the bottom of the downloads page, there is a section called ‘RLM License Server’ - this is where the RLM Server software can be downloaded.
Click on the link to download the RLM License Server for your platform, in this example we will download it for Windows.
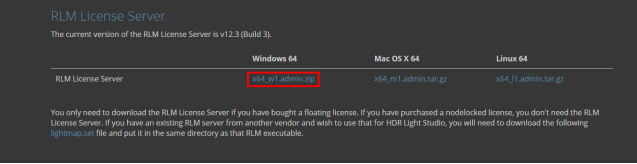
You will need to read and agree to the terms of the EULA in order to actually start the download.

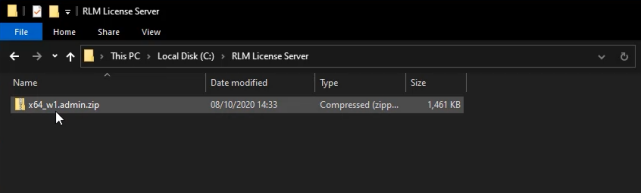
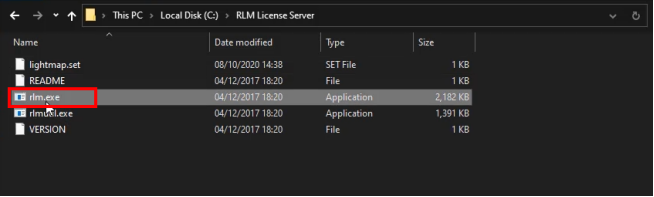
Place the zip file containing the RLM License Server software in the location where you want to install the RLM server software - this can be anywhere. In this example, the RLM License Server software is going to be installed on the C Drive, inside a folder called ‘RLM License Server’.
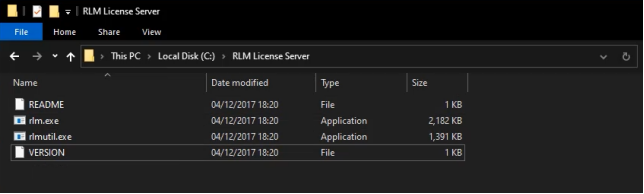
Then, unzip the file. Once the content of the zip file is unzipped, you can delete the zip file. The next image shows the contents of the RLM folder - there is no installer as such, these files are the RLM server software.
Step 3: Download and install the lightmap.set file
Next, download the lightmap.set file which is required to install HDR Light Studio floating licenses.
This can is downloaded from the downloads page, there is a link to this file shown below.

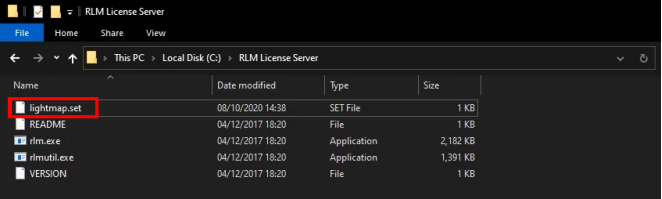
Place the lightmap.set file in the RLM folder next to the RLM executable.
Step 4: Start RLM server software
Start the RLM application by double clicking the rlm.exe file.
When running it for the first time, you will get a Windows Security Alert about the Firewall. It’s important to give the RLM software access to private networks so that the RLM Server can speak with other computers on the network.

The RLM application is now running.
Minimize the RLM application using the button highlighted top right - to keep it running but hide it away whilst completing the next steps.

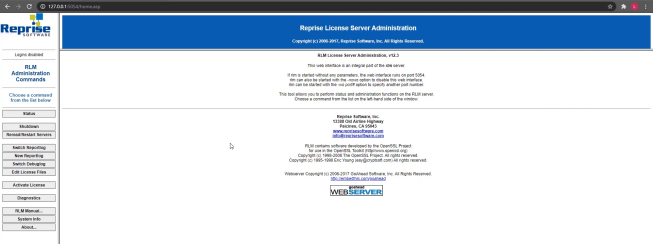
Step 5: Start the RLM Server Administration Web Page
Go to a web browser and type in the address 127.0.0.1:5054. If it’s not loading, make sure your RLM application is still running. You should see the web page shown below being served up from the running RLM server software – if you do that’s great, it shows that RLM is working fine!
Step 6: Generate Floating License files
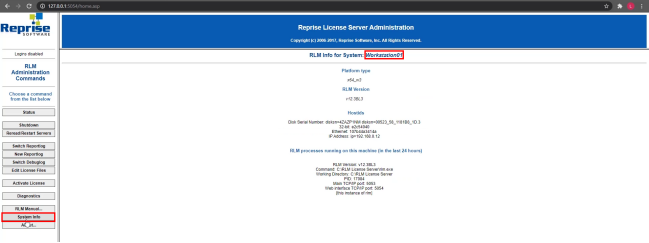
Whilst on the RLM web page on your license server computer, click on ‘System info’ to display information about your computer system.
You can see that the working directory is set to the RLM License Server folder, that has been created on the C drive, that’s good.
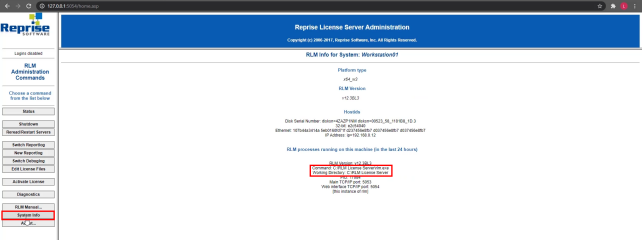
On the system info page, you can find 2 important pieces of information that you will need for generating your floating licenses.
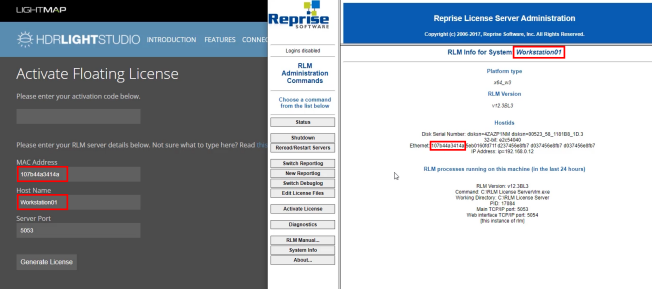
1) The Host Name, in this example it’s Workstation01
2) The MAC address or addresses

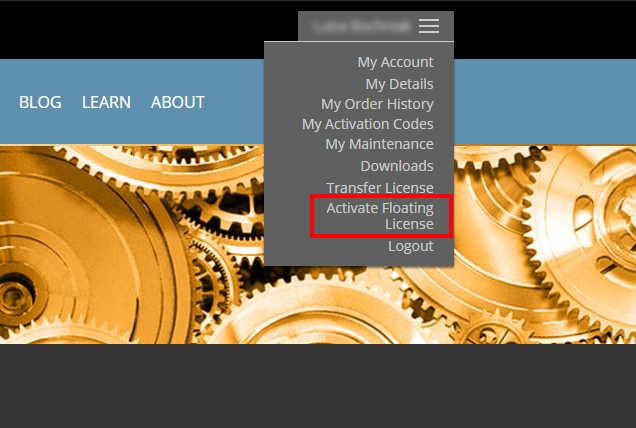
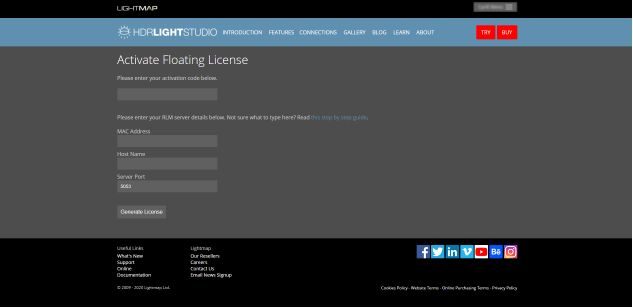
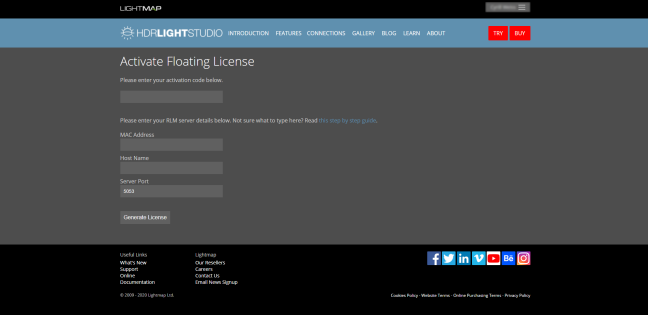
Leave the RLM Server Administration web page open, and open a new browser window and click on your username in the top right, then select ‘Activate Floating License’ from the drop-down menu.
Copy the first MAC address of your computer system from the RLM web page and paste it in the ‘MAC Address’ field on the ‘Activate Floating License’ web page. The license file will be locked to an RLM server computer with the MAC address you put in on this page.
Please ensure the MAC address you put in is of the hardware that will always be active on your license sever computer. For example, if you installed on a laptop, this should not be a MAC address only active when a USB to Ethernet adapter is plugged in.
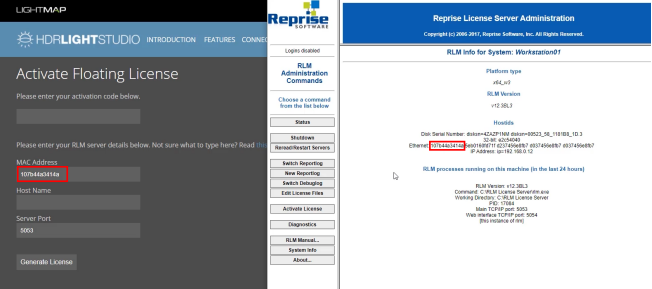
Now let’s copy and paste the Host Name. We can leave the server port as the default 5053.
The host name and port can be changed in the future by editing the license file generated. This doesn’t invalidate the license file. However, it’s critical that the MAC address is correct as this cannot be edited, so always double check it after pasting it.
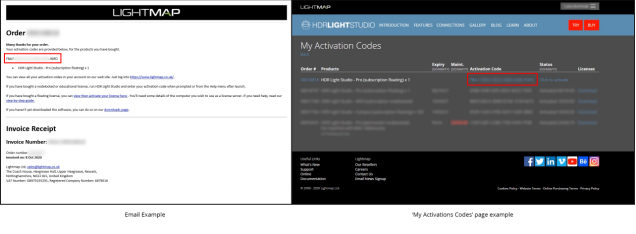
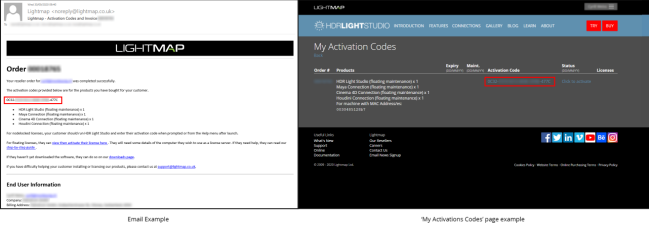
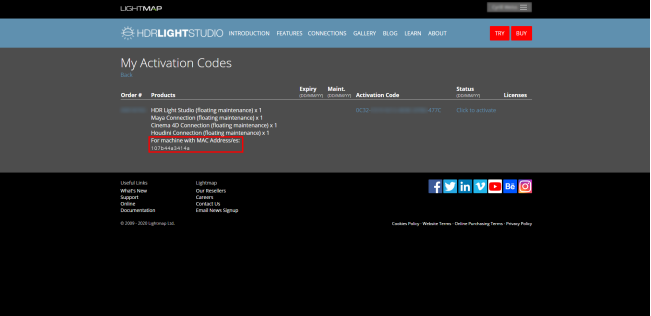
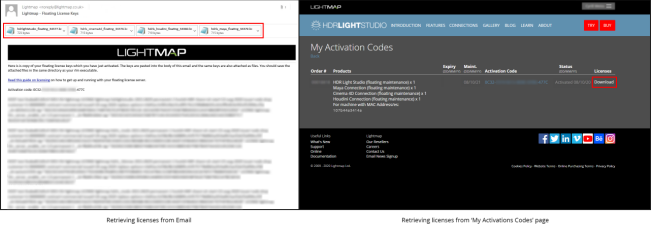
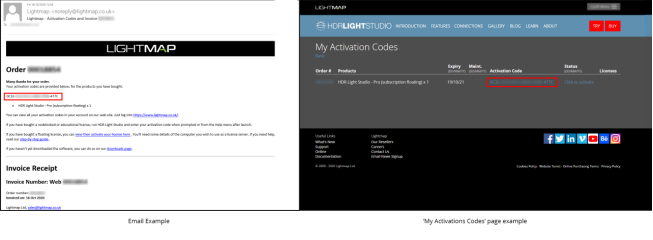
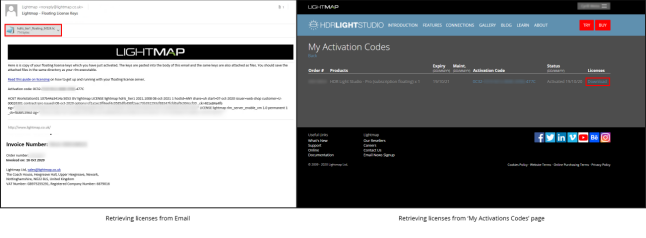
All that’s left is the activation code, which you can copy either from the email you have received or from the ‘My Activation Codes’ page.
Paste the activation code on the ‘Activate Floating License’ web page, ensuring all characters have been pasted.
Then click on ‘Generate License’ to generate your floating license/s.

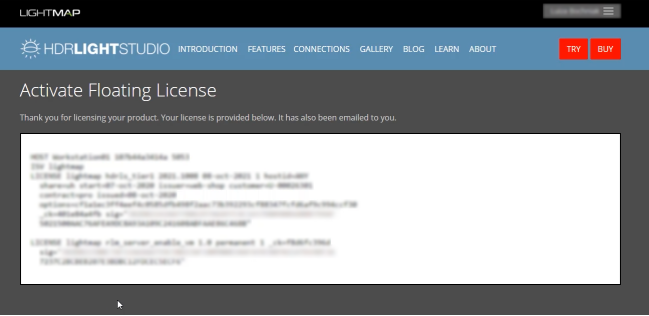
You have now generated your floating licenses. You can see the details for the licenses on the resulting web page.

Step 7: Download your floating licenses
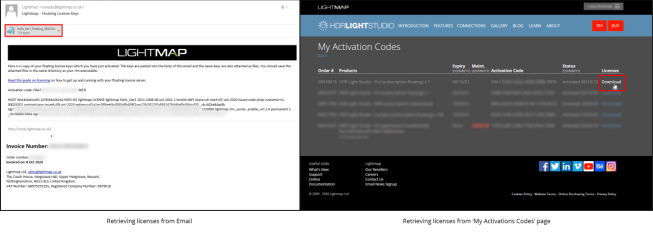
You will have been sent an email with the license files attached. Or another way to access your floating licenses is to go to the ‘My Activation Codes’ page and click on ‘Download’ next to the activation code you just used.
If you do not see ‘Download’, instead you see ‘Click to activate’, it’s likely that you haven’t refreshed the ‘My Activation Codes’ page after generating your licenses, so refresh it now. Please note that licenses downloaded this way are zipped.
Step 8: Install the Floating Licenses
Once you have your floating license files (if your licenses are in a zip file, unzip them before proceeding), you need to install them by simply placing the .lic files in the same directory as your RLM application – in this example in C:\RLM License Server

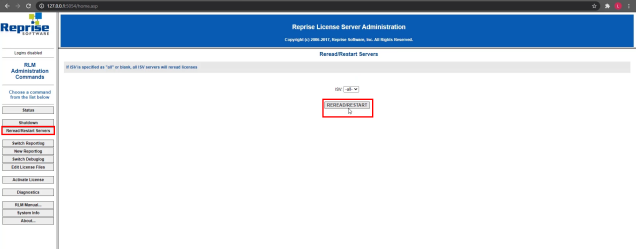
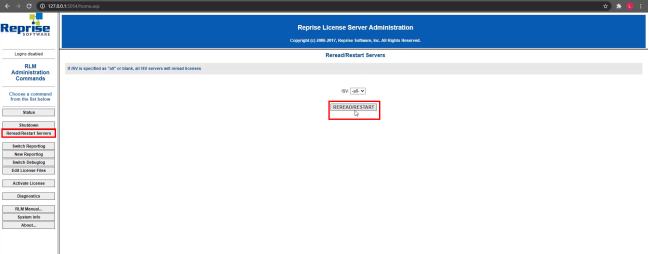
You now need to tell the already running RLM server software to restart and reread the installed floating licenses. Open a web browser and go to the address 127.0.0.1:5054 if you’re not already
there, and click on ‘Reread/Restart Servers’. Then, press the ‘REREAD/RESTART’ button. This will restart the RLM software and it will read the floating licenses you have installed.
Now if you click on ‘Status’, you will see the status of your HDR Light Studio floating licenses under the ‘Lightmap’ name.
Please Note: If you are not seeing Lightmap licenses, it could be because you forgot to download and place the lightmap.set file next to your RLM executable. If this is the case, re-visit Step 3.
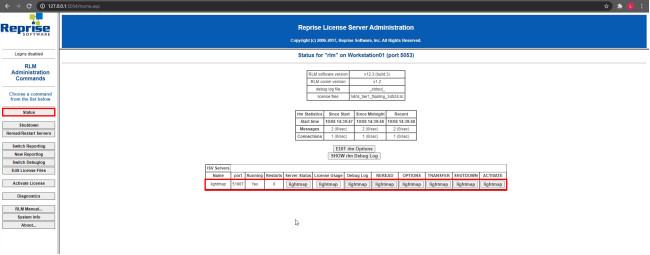
Figure 24: Viewing the status of the floating licenses
The floating licenses are now installed and running.
Step 9: Setup the Client Computers to use the Floating Licenses
The client computers are each computer where you have installed and want to use HDR Light Studio.
First, make a note of the IP address of your RLM server computer. You can find it by going back to the RLM web page and then clicking on ‘System info’ in this example it’s 192.168.0.12

Now you’re ready to set up the client machines.
Go to your chosen client machine now, then proceed further with these instructions on that machine.
HDR Light Studio should be already installed on your client machine, if it isn’t see Installing HDR Light Studio before proceeding further.
Launch HDR Light Studio

Starting HDR Light Studio on a client machine
There is a chance HDR Light Studio will automatically find the RLM licenses over the network. If this is the case, HDR Light Studio will simply start without a license warning dialog box. That will be it! The software is ready to use.
However, most times the licenses are not automatically found. On launch you will see this licensing panel.
Click on ‘Connect to Floating License Server’ button.
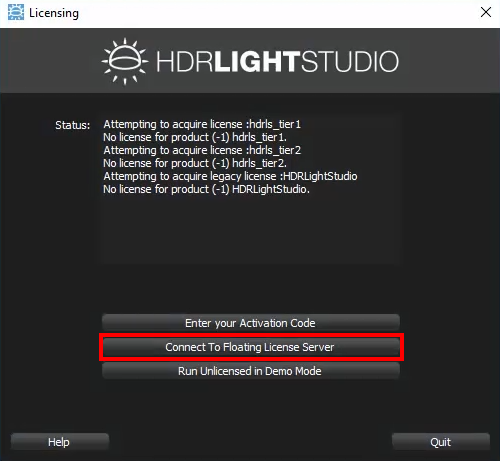
Choosing to license HDR Light Studio using a floating license
Now you can enter the IP address of your RLM Server that you have set-up in previous steps, in this example: 192.168.0.12. Leave the port as default, i.e. 5053, and click on ‘Submit’.
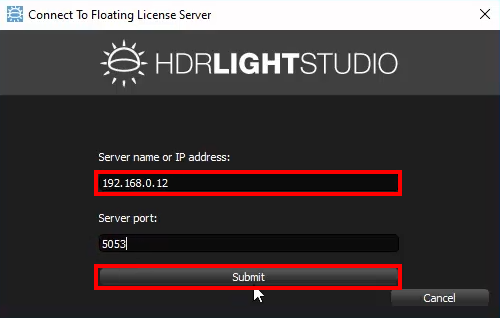
Figure 28: Connecting to the RLM Server
As long as the client machine can find the RLM Server software running on the license server computer via local network, a local hdrls_server.lic file will be created, that contains the IP address and port where the floating licenses can be obtained.
Press Finish and HDR Light Studio will now run licensed!

Figure 29: HDR Light Studio connected to the RLM server
The software is now ready to use.
Start from Step 3: Download and install the lightmap.set file
I have purchased maintenance for my HDR Light Studio Floating licenses and would like to update my license files to have the new maintenance date.
Step 1: Generate Floating License
Login then click on your username in the top right, and select ‘Activate Floating License’ from the drop-down menu.

You will be taken to the ‘Activate Floating License’ web page – this is the page where you will generate your new Floating licenses with your updated maintenance date.
When you purchased maintenance for your permanent licenses, you were supplied with a new activation code. This new activation code will let you redeem your new license files with an updated maintenance date.
Copy your new activation code either from the email you have received or from the ‘My Activation Codes’ page.
Next, paste the activation code on the ‘Activate Floating License’ web page, ensuring all characters have been pasted.

The activation code is locked to use the MAC address we already have on file for your current permanent license. In the case of Transferred licenses, this is the MAC address of the machine where the software was last transferred to. In other words, the activation code is locked to a MAC address of the license server computer that is currently hosting your HDR Light Studio licenses. Therefore, renewing maintenance does not give you an additional opportunity to relocate your software.
You can check what MAC address is locked to your new activation code on the ‘My Activation Codes’ page.
Please note: If the MAC address shown on the ‘My Activation Codes’ page is not what you expect and is for a different machine, get in touch with us by email.
Copy the MAC address locked to your activation code from the ‘My Activation Codes’ page and paste it in the ‘MAC Address’ field on the ‘Activate Floating License’ web page.

All that’s left is the Host Name. You can copy it from the ‘System Info’ area on the RLM web page, which you can access by typing the address 127.0.0.1:5054 into your web browser on the RLM License Server machine where your current licenses are installed.
Paste the host name of your license server computer in the ‘Host Name’ field on the ‘Activate Floating License’ page. Leave the server port as the default, i.e. 5053, unless your requirement is to use a different port, then click on ‘Generate License’.

Figure 8: Generating new floating licenses with updated maintenance date
The host name and port can be changed in the future by editing the license file generated. This doesn’t invalidate the license file. However, the MAC address cannot be edited.
You have now generated your new floating licenses with the updated maintenance date. You can see the details for the licenses on the resulting web page.

You will now be sent an email with your new license files attached. Or another way to access your new floating licenses is to go to the ‘My Activation Codes’ page and click on ‘Download’. If you do not see ‘Download’, instead you still see ‘Click to activate’, it’s likely that you haven’t refreshed the ‘My Activation Codes’ page after generating your licenses, so refresh it now.
Step 2: Install Floating Licenses
Once you have your new floating license files (if your licenses are in a zip file, unzip them before proceeding), you need to install them by simply placing the new .lic files in the same directory as your RLM application – in this example it’s in C:\RLM License Server.
Your new floating licenses have a replace flag set and will override your old floating licenses with older maintenance dates.

If you want to you can delete your old set of licenses with an expired maintenance date, but you don’t have to as HDR Light Studio will use your new licenses either way.
You now need to tell the RLM server software to restart and reread the installed floating licenses. Open a web browser and go to: 127.0.0.1:5054, then click on ‘Reread/Restart Servers’. Next, press the ‘REREAD/RESTART’ button. This will restart the RLM software and it will read the new floating licenses you have just installed.
Step 3: Setup the Client Computers to use the Floating Licenses
Client computers do not need to be updated. Next time HDR Light Studio is run, it will pick up the new license from the RLM server.
If you have 'renewed' your subscription floating licenses, here are instructions on how to create and install your new licenses.
You should complete this process on the day your previous floating licenses expire. As the 1 year starts from the activation date of these new licenses.
Stage 1: Generate and Download Floating Licenses
Login and then click on your username in the top right, and select ‘Activate Floating License’ from the drop-down menu.

You will be taken to the ‘Activate Floating License’ web page – this is the page where you will generate your new Floating licenses.
When you purchased a new subscription floating license, you were supplied with a new activation code. This activation code will let you redeem your new license files to use for another year from the date of the activation.
You have up to 30 days after the purchase date to activate your software, if you don’t, your 1-year subscription will start after the 30 days grace period.
Copy your new activation code either from the email you have received or from the ‘My Activation Codes’ page.
Paste the activation code on the ‘Activate Floating License’ web page, ensuring all of it has been pasted.
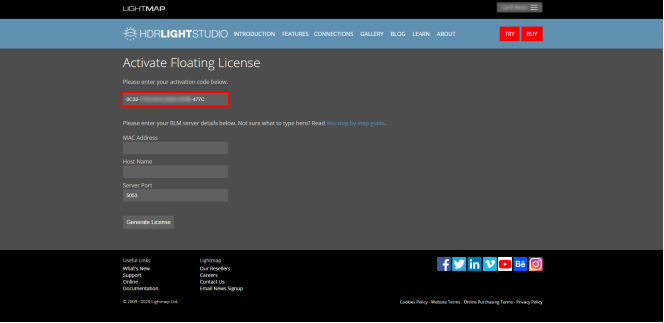
Figure 4
Copy the first MAC address of your RLM Server. You can copy it from the ‘System Info’ area on the RLM web page, which you can access by typing the address 127.0.0.1:5054 into your web browser whilst on your license server computer.

Paste the MAC address in the ‘MAC Address’ field on the ‘Activate Floating License’ web page

The host name and port can be changed in the future by editing the license file generated. This doesn’t invalidate the license file. However, it’s critical that the MAC address is correct as this cannot be edited, so always double check it after pasting it.
All that’s left is the Host Name of your RLM server.
Copy the Host Name from the ‘System Info’ area on the RLM web page.

Paste the host name of your RLM server in the ‘Host Name’ field on the ‘Activate Floating License’ page. Leave the server port as the default, i.e. 5053, unless your requirement is to use a different port, then click on ‘Generate License’

You have now generated your new subscription floating licenses for your RLM server. You can see the details for the licenses on the resulting web page.
You will now be sent an email with your new license files attached. Or another way to access your new floating licenses is to go to the ‘My Activation Codes’ page and click on ‘Download’. If you do not see ‘Download’, instead you still see ‘Click to activate’, it’s likely that you haven’t refreshed the ‘My Activation Codes’ page after generating your licenses, so refresh it now.
Stage 2: Install Floating Licenses
Once you have your new floating license files (if your licenses are in a zip file, unzip them before proceeding), you need to install them by simply placing the new .lic files in the same directory as your RLM application on your license server computer – in this example it’s in C:\RLM License Server.

HDR Light Studio will disregard your old expired licenses once it finds your new active subscription floating licenses. If you want to you can delete your old and expired set of subscription floating licenses – but you don’t have to.
You now need to tell your RLM server software to restart and reread the installed floating licenses.
Open a web browser and go to the address 127.0.0.1:5054 if you’re not already there, then click on ‘Reread/Restart Servers’. Next, press the ‘REREAD/RESTART’ button. This will restart the RLM software and it will read the new floating licenses you have just installed.

Stage 3: Setup end user computers to use the Floating Licenses
Client computers do not need to be updated. Next time HDR Light Studio is run, it will pick up the new license from the RLM server.

© Copyright 2000-2026 COGITO SOFTWARE CO.,LTD. All rights reserved
