Introduction into CI process
The modern software development process is impossible without constant improvement. There will be multiple builds for each change, and it is only an accomplished build tested in its entirety that can be pushed to production.
Continuous integration (CI) is the process that verifies the creation and thorough testing of all those builds. This way, developers ensure that each new change works as planned, and all the other modules and functions are also correct.
The process can’t be manual. It would be too long, tiresome, and complicated. In its turn, automation of Continuous Integration offers all kinds of benefits:
The biggest advantage is that automation removes the risks of errors for both the application and the database releases. The latter is crucial as the databases are the core of applications. Missing any bug in a database causes much more problems.
The Specificity of the Jenkins Continuous Integration Server
The key element is the continuous integration server. It is the driving force that manages builds, tests and deploys them, reports the results, and documents all the details for developers and analysts. Among the leaders of this technology, it’s worth talking about Jenkins.
The Jenkins CI server is an extremely popular open-source solution with wide automation options. It also allows integrating other applications via API and third-party build tools, thus becoming more powerful. Many specialists consider Jenkins the CI server standard.
It is compatible with Windows, Unix, or Linux, as it runs in a Java environment. Due to its open-source nature, it is the default choice for many smaller companies that can download it and use it for free. An impressive number of libraries and plugins let the users adjust the CI server performance to all their needs and for any complexity of operations.
DevOps Automation on Jenkins with the Devart dbForge Plugin
The Devart dbForge DevOps Automation for SQL Server ensures Jenkins CI server support. There is a dedicated Plugin for establishing and configuring all continuous integration phases on Jenkins:
Devart dbForge DevOps Automation for SQL Server lets the users reduce the database release costs, improve the update quality and overall workflow, and minimize risks of deployment errors. Further, we’ll examine the usage of this plugin in a practical scenario.
If you never worked with Devart products, you need to install them on the machine serving as a build agent. Choose one of the below options (there are fully-functional free trials for each of the mentioned tools):
Besides, you need dbForge DevOps Automation PowerShell for SQL Server — get it from the PowerShell Gallery and install.
Install the Plugin
The dbForge DevOps Automation for SQL Server plugin is present in the standard Jenkins collection. Thus, you install it in the same way as all other plugins.
1. In the Jenkins home page window, navigate to Manage Jenkins > Manage Plugins:
2. On the Available tab, select the dbForge DevOps Automation for SQL Server plugin (you can use the Search option to find it faster).
3. Then, install the plugin using the default Jenkins options:
Create a new SQL CI job
After the plugin installation, we create a Continuous Integration job.
1. Navigate to the Jenkins home page > New Item:
2. Give the project a name, specify the project type, and click OK.
Configure the CI job
1. Enter the project description and specify the path to the working directory:
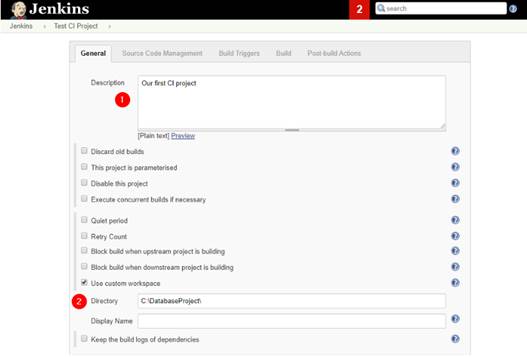
Note: Jenkins assumes that the Version Control System is already linked for pulling changes from the Script Folders. If not, you can arrange to pull the changes from your VCS as a separate Jenkins job.
2. Configure Build Triggers. For instance, you can set the build jobs on schedule:
Build the database package
Necessary tools: dbForge Studio for SQL Server or dbForge Schema Compare Pro for SQL Server.
At this stage, you build the database package and deploy it from the Script Folder on the server. We use the installed dbForge DevOps Automation for SQL Server plugin.
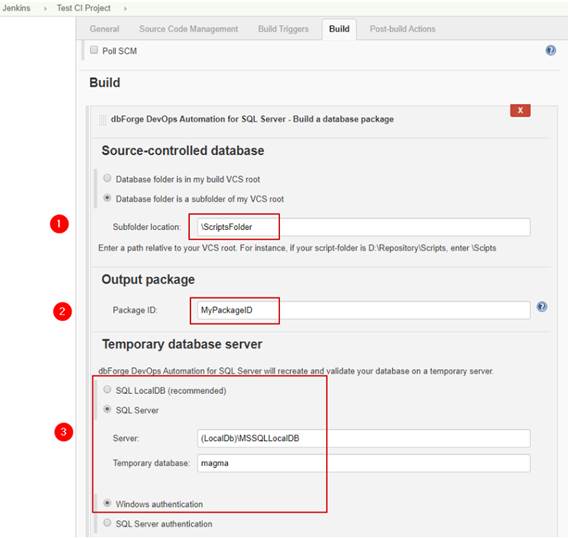
1. Click Add build step > Build a database package (note the plugin name defined for the step):
2. In the Build window, provide the following details:
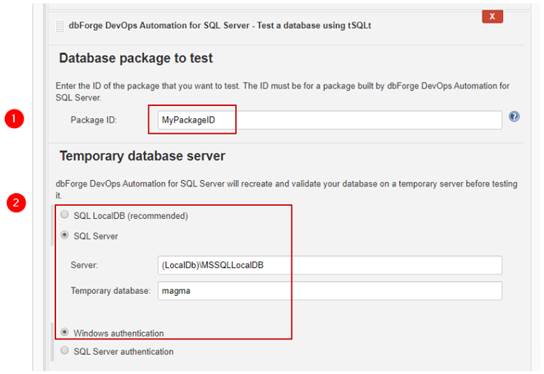
Test the database using tSQLt
Necessary tools: dbForge Studio for SQL Server or dbForge Schema Compare Pro for SQL Server and dbForge Unit Test for SQL Server
Unit tests validate the SQL scripts deployed on the server at the Build stage. To configure the process:
1. Click Add build step > Test a database using tSQLt:
2. In the configuring window, specify the Package ID, the server, and database names which were also set at the previous stage:
Publish the database package
Necessary tools: dbForge Studio for SQL Server or dbForge Schema Compare Pro for SQL Server
At this stage, we pack the Script Folder and publish the NuGet package on the specified server.
1. Click Add build step > Publish a database package:
2. In the configuring window, define the Package ID and specify the upload path for the package:
Run the project
Run the process manually from the Jenkins home page. Select the necessary project and click the icon next to it, as shown below:

You can view the execution results on the Console Output. It provides both the general information and the data for each previously described step (unit tests’ results or NuGet package publishing results).
The result of creating the database from the Script Folder are presented in the following way:
Using the dbForge DevOps Automation Plugin for Jenkins is a method favored by many professionals. The plugin steps include all the necessary commands and put them in the correct sequence. Thus, there is no need to enter them manually during the job configuration, as the dbForge tools will care about them.
However, there is another method that is also applicable for automating CI processes. The method is using the Jenkins Command-Line interface.
Automate the database releases on Jenkins with the dbForge tools and Command-Line
For doing the jobs, you will need dbForge Studio for SQL Server that has all the necessary functionality for working with the command line. Or, you can use separate tools, the same as defined at the beginning of this article.
Select the method
To automate the CI jobs using Command-Line, navigate to Add build step and select Run with timeout from the drop-down menu:
Jenkins will open the following window to configure the step:
Choosing this approach has an additional advantage: You can limit the time of the operation performance. It is convenient to avoid unpredicted hangings. Also, you can check the ExitCode of the executed command in the Advanced options.
Automate the database releases through Command-Line
We’ll use a simple scenario with the test example database called AdventureWorks2019. Currently, this database is located in the Git repository. Hence, we need to perform the following steps:
1. Download the script folder into the temporary directory of our machine. In our case, the directory is D:\Temp\DevOps\. Execute the following CMD in Jenkins:
git clone https://github.com/svetlanafet/AdventureWorks2019.git D:\Temp\DevOps
2. Create the AdventureWorks2019 test database with its objects. Execute the following SQL Server scripts for the Command-Line.
The dbForge Studio for SQL Server script:
cd "C:\Program Files\Devart\dbForge Studio for SQL server"
dbforgesql.com /execute /connection:"%user connection%" /inputfile "D:\Temp\DevOps\Create_AdventureWorks2019.sql"
dbforgesql.com /schemacompare /compfile:"D:\Temp\DevOps\AdventureWorks2019.scomp" /sync
The dbForge Schema Compare for SQL Server script:
cd "C:\Program Files\Devart\dbForge Schema Compare for SQL Server"
schemacompare.com /execute /connection:"%user connection%" /inputfile "D:\Temp\DevOps\Create_AdventureWorks2019.sql"
schemacompare.com /schemacompare /compfile:"D:\Temp\DevOps\AdventureWorks2019.scomp" /sync
3. Now, we can deploy the data to the database. All the listed dbForge tools work via CMD and participate in automation.
Note: First, we must configure the (scomp) template file in dbForge Schema Compare for SQL Server. It is necessary for syncing our script folder with the server.
Generate test data
dbForge also provides the functionality for the data generation at the Test stage before running tSQLt unit tests. This functionality comes in handy when users need to deploy large data volumes, but they can’t or won’t store all those data on the drives.
Here we need to configure the (.dgen) project file with all settings and rules for test data generation (the applicable tool is dbForge Data Generator for SQL Server). Then, you should locate this file in VCS for the system to make the correct path to the checkout directory.
For dbForge Studio for SQL Server, use the following command to deploy the test data into the table:
dbforgesql.com /generate data /project file:"D:\Temp\DevOps\Addressr.dgen"
For dbForge Data Generator for SQL Server, use the below command:
datagenerator.com /generatedata /projectfile:"D:\Temp\DevOps\Addressr.dgen"
No matter if you prefer using the dedicated plugin for Jenkins or automate the database releases through command-line, you can apply the dbForge tools for SQL Server. They all serve properly for automation purposes and help you remove the tiresome routines.

© Copyright 2000-2026 COGITO SOFTWARE CO.,LTD. All rights reserved
